September 6, 2013

Elegant and Easy 4 Layer Carrot Cake


It's back to school time and for me this time of the year has always been very nostalgic for me. Believe it when I say that I've been out of school for many moons now, but the return of the cooler Canadian air along with the warm September sun just makes me long for some of my favorite childhood comfort foods. Carrot cake is a pure comfort food, wouldn't you agree? So today I decided to try making this cake with a little bit of a twist. Instead of baking it in conventional cake pans I actually baked it in an 16 X 11 jelly roll pan, cut the cake into 4's and then stacked them to create an elegant look.

The ingredients are pretty basic but since the cake is in a wider longer pan, the baking time is drastically reduced. The authors of this recipe adds baking soda to the batter in order to raise the pH enough to soften the carrots during the short cooking time. And it did work, the carrots were cooked perfectly.

Ingredients:

1 3/4 cups all-purpose flour
2 tsp. baking powder
1 tsp. baking soda
1 1/2 tsp. ground cinnamon
3/4 tsp. ground nutmeg
1/2 tsp. salt
1/4 tsp. ground cloves
1 1/4 cups packed light brown sugar
3/4 cup vegetable oil
3 large eggs
1 tsp. vanilla extract
2 2/3 cups shredded carrots

I used store bought cream cheese frosting, roughly 32 ounces, but of course you can always make your own.
2 cups chopped pecans


First set your oven's baking rack to the middle position, then preheat it to 350 F. Prepare your jelly roll pan by greasing it with cooking spray and then lay a a piece of parchment paper on top and grease the paper with the spray.

In large bowl whisk together the first seven dry ingredients. In another large bowl whisk together the brown sugar, vegetable oil, eggs and vanilla extract. Stir in the carrots and the dry ingredients. Then using a rubber spatula, fold the mixture until it is just combined. Pour the batter into your prepared pan making sure to spread the batter into the corners. Place in oven and bake for 16-18 minutes. Remove from oven and let cool 5 minutes on a baking rack. 

Next transfer the cake onto the rack with the parchment paper still under the cake and let cool completely, about 30 minutes. Once cake is cooled, slice the cake in half crosswise cutting through the parchment paper as well. Then slice each half lengthwise, again making sure you cut the parchment paper, to create 4 equal rectangle cakes. 


Using a cake board or large plate turn one of the cakes onto it, paper side up, and then carefully peel off the paper. Spread about 1/2 to 2/3 cup of frosting on to the first layer and then repeat for the other three layers. (If your cake has baked with an uneven thickness, adjust the orientation of the layers so they are stacked to produce a level cake.) Once your cake is assembled frost all 4 sides of the cake. Then gently press the chopped pecans into the 4 sides of the cake. 


Chill for about one hour before serving.

Enjoy!!!

(This recipe was adapted from The Best of America's Test Kitchen 2013)


Sharing this post at link parties over at these wonderful blogs...
StoneGable
Posed Perfection
Daily Dish Magazine
BeColorful
Ivy & Elephants
It'sOverflowing
Common Ground


September 3, 2013

Farmhouse Vegetable and Barley Soup (with homemade croutons)


Weeknights tend to get hectic this time of the year with all of the after school activities and such, so I am always on the hunt for no-fuss easy diner time ideas. This is hearty yet nutritious soup can be made ahead and be served up as great for a quick weeknight dinner. To give this soup's broth some depth of flavor, I tossed in whole Baby Bella mushrooms instead of the expensive dried Porcini mushrooms the recipe called for. I also omitted the turnips because I didn't have any on hand, and just used Yukon Gold potatoes.


Ingredients:

8 oz. pkg of Baby Bella Mushrooms, rinsed thoroughly
4 sprigs of fresh thyme
8 sprigs of fresh Italian parsley, minced
2 bay leafs
2 T unsalted butter
3 large leeks, white and light green parts only, slice in half lengthwise and then sliced into 1/2 inch thick pieces and rinsed thoroughly 
2 carrots peeled and diced
2 celery stalks cut into 1/2 inch slices
23 cup dry white wine (sauvignon blanc)
2 T soy sauce
4 cups low sodium chicken broth
1/2 -3/4 cup pearl barley
2 garlic cloves, crushed
2 Yukon Gold potatoes
1/4 of a cabbage, chopped
1/2 cup frozen peas
1 tsp lemon juice
salt and pepper

Heat the butter in a dutch oven or large pot and add the leeks, carrots, celery, wine and soy sauce. Let simmer stirring occasionally, until the liquid has evaporated and the celery is soft. Roughly 10 minutes.

In the meantime, tie together the thyme and parsley with some kitchen twine. Once broth is evaporated, add the broth, barley, mushrooms, herb bundle, bay leaf and garlic, plus 2 cups of water to the pot. Bring to a boil and then reduce heat to medium-low and let simmer for about 25 minutes.

Add the potatoes and cabbage and return to a simmer for another 18-20 minutes.

Remove pot from heat and remove the herb bundle and bay leaf. You can also take out the mushrooms at this time and set them aside for another use. (I just ate them whole - they were so yummy after cooking in the broth.) Stir in the peas and lemon juice and season with salt and fresh cracked pepper if you have it.

_________________________________________

To make the croutons...

Melt 2 T of unsalted butter in a small pan. Add some fresh thyme and parsley and stir for 20 seconds. Take 4 slices of hearty white bread and cut it into 1/2 inch pieces. Trim off the crust. Once butter is hot add the bread and season with salt and pepper. Cook the bread until it is a gold brown, 5-10 minutes. Remove the bread and let cool on paper towels.

Serve soup with the croutons and some more minced fresh parsley sprinkled on top.

Enjoy!
(This recipe was adapted from The Best of America's Test Kitchen 2013)

Sharing this recipe at these wonderful blog parties...
Posed Perfection
Daily Dish Magazine
StoneGable

August 27, 2013

Getcha Homemade Soft Pretzels Here!


Pretzels are the hot foodie item this fall with all of the pretzels buns and pretzel cones and crusts, and why not...pretzels are sooo versatile. And really once you get the hang of it, they are pretty easy to make. This recipe is from Better Homes and Gardens Fall Baking  magazine and yields 8 soft pretzels. 

Super simple ingredients include:
3/4 cup of milk (not fat free)
1/4 cup water
1 1/2 T. sugar
1 pkg dry yeast
2 1/3 to 2 1/2 cups all-purpose flour
2 T softened butter
1 1/4 tsp. salt
3 cups hot water
1/2 cup of baking soda
1 egg yolk lightly beaten
1 T water
Kosher salt

In a small saucepan heat milk and 1/4 cup of water along with the sugar. Heat until warm about 110 degrees F. Remove pot from heat and pour into the large bowl of a free standing mixer. Sprinkle in the yeast and let set for about 5 minutes. This will activate the yeast and should begin to foam.

Add 2 1/3 cups of flour to the yeast mixture and then using the hook attachment of  your mixer, beat on low speed for about 3 minutes. Scrape the sides of the bowl. Then bump the speed up to medium low and beat for another 8 minutes. The dough should begin to pull away from the sides of the bowl. If it doesn't add a little more flour to the mixture.The dough should be slightly sticky.

Turn dough out onto a clean surface and knead it for about a minute. Grease a large bowl with cooking spray and then place the dough in it and roll the dough around until it is coasted with the spray. Cover bowl with a clean dish towel and place in a warm spot for about one hour.

Punch the dough down and then separate it into 8 equal balls. Roll and stretch each ball until it is about 24 inches in length. I rolled the dough between my hands and then pulled on it every so often just to stretch it out. Lay your 8 ropes of dough out and cover them with clean towel for 10 minutes. 

Preheat your oven to 450 degrees F and place parchment paper on a large jelly roll pan or cookie sheet.

Next pick up one of your ropes holding one end in each hand so the dough looks like the letter "U". Cross the two ends and then twist the ends two times. Bring the ends down to the bottom of the "U" to create your pretzel shape. Once all of your pretzels have been twisted, in a bowl slightly larger than your pretzels, add the 3 cups of hot water along with the 1/2 cup of baking soda. Using a slotted spatula or spoon, dip each pretzel into the baking soda and water for 10 seconds and then let it drain on some paper towels. Pat the tops dry with more paper towel. 

Place your pretzels on the prepared tray. Brush the egg yolk on the tops of the pretzels and sprinkle on your Kosher salt. Bake for about 10 to 12 minutes. Cool on wire rack.

Enjoy!!!


PS...if you are wondering where the other four pretzels are you'd have to ask Michael and Gracie!

Sharing this recipe at these wonderful blog parties...


HOMEMADE SOFT PRETZELS


August 12, 2013

Watermelon Lemonade!


Now what do you get when you cross some bright tart lemons


with some sweet and cool watermelon?


Why you get watermelon lemonade of course!!!


Ingredients for this super cool and refreshing lemonade.

3/4 cup sugar
3/4 cup water
1/2 cup of fresh squeezed lemon juice
2 cups cold water
4 cups of watermelon, cubed
lots of ice cubes

Heat 3/4 cup of water with the 3/4 cup of sugar, cook until sugar is completely dissolved in the water, about 3-5 minutes. Add the 2 cups of cold water and set aside.

Puree the watermelon in blender until smooth. Strain the liquid through strainer.  Fill glasses with ice and spoon about 3-4 teaspoons of watermelon on top of the ice. Pour the lemon mixture over the ice and serve. 

(If you want to enjoy this as a big girl drink add 2 oz. of vodka or a spiced rum to each glass.)

Makes approximately 6 cups.  


This recipe was adapted from allrecipes.com

Sharing this post at link parties over at these fabulous blogs...

August 7, 2013

Roasted Corn Chowder with Shrimp


A few years ago a good friend of my was parting ways with a few cookbooks she never really looked at, and knowing me as she does, (I tend to hoard collect cookbooks of all kinds) she asked me if I would like any of them. Trying my best to hold myself at bay, I accepted a few of her offered books and among them was a book all about cooking from scratch with various herbs and spices.

One of the first recipes that caught my eye was a wonderful corn and shrimp chowder served over warm mashed potatoes. Although I love the idea of the mashed potatoes, I decided to modify the recipe so it is better suited to eat during the summer months. I did this by omitting the mashed potatoes and then using fresh kernels cut right from the cob and pan roasting them.


Ingredients:

1 T olive oil (Extra Virgin if you have it)
1 medium onion, chopped
2 medium carrots, diced
2 cloves of garlic, minced
3 cups of low sodium chicken broth
1 cup of homemade shellfish stock or an 8 oz bottle of clam juice
2 heaping tsp. of dill seed. NOT DILL WEED
5 ears worth of fresh cut kernels
one more T of olive oil
salt and pepper to taste
1 1/2 lbs of medium raw shrimp, peeled and deveined with tails removed. If using large shrimp you can cut them in half.
3 T of fresh parsley


Heat oil in a large saucepan and then saute the onion and carrot over medium heat until onion becomes translucent, about 5 minutes. Add the broth, shellfish stock and dill seeds, bring to a boil and then lower the heat, cover and let simmer for about 20 minutes.

In the meantime heat another T of olive oil on low heat in a large frying pan, add the kernals and season with salt and pepper. Cook corn while stirring, for about 5 -7 minutes or until the kernels turn a golden brown. Watch the pan doesn't get too hot or you may find yourself ducking from hot popping corn

Add all but about 4 T of the roasted corn to the broth mixture and let simmer for another 10 minutes. Allow mixture cool somewhat and then add all but about 2 cups of the liquid to a food processor or blender and puree in batches until smooth. (Be careful if you are using a blender and the liquid is still hot. Only fill 1/3 of the way to avoid the hot liquid spitting out of the top.) 

Add all of the mixture back to the saucepan. Add the shrimp plus 2 T of the parsley and simmer until shrimp are no longer pink...about 2 1/2 minutes. Ladle into bowls and garnish with the remainder of the roasted corn and parsley. 

Serve with a crusty bread and enjoy it with a nice cold glass of German Riesling. 


Sharing this pot over at these super blog parties...
StoneGable
Lamberts Lately
Be Colorful
Savvy Southern Style
Elizabeth & Co.


ROASTED CORN CHOWDER WITH SHRIMP

August 6, 2013

A Refreshing Basil Cucumber Mint Soda


Last year I fell in love with this combination of flavors in the form of a cucumber martini, and this year, well it is as a fizzy drink!

This is a naturally refreshing drink with far less calories then a regular soda. I'm talking maybe 60 itsy bitsy little calories per one 12 oz drink. The idea here is that you make your own simple syrup and then add the basil, cucumber and the mint to the melted sugar and let it steep for about 30 minutes. This infuses all of these fabulous flavors into the sugar.


Here's what you will need...

1/2 large cucumber sliced thin
12 fresh mint leaves
6 fresh bail leaves
about 3 cups club soda or seltzer

...and this simple syrup recipe.
1/2 c sugar
1/2 c water

Heat both the sugar and water in a small saucepan and stir continuously until the sugar dissolves. 

Here is what you need to do...

Remove syrup from the heat and then add cucumber, basil and mint and let sit for 30 minutes. Strain the simple syrup into a jar, pressing the solids in strainer. Fill six 12 oz glasses with ice. Add 2 T. of the simple syrup and then add the soda water.
Garnish with cucumber and mint.

And then sit back in your chair by the pool and enjoy this cool and refreshing beverage!!!


REFRESHING BASIL CUCUMBER MINT SODA

August 2, 2013

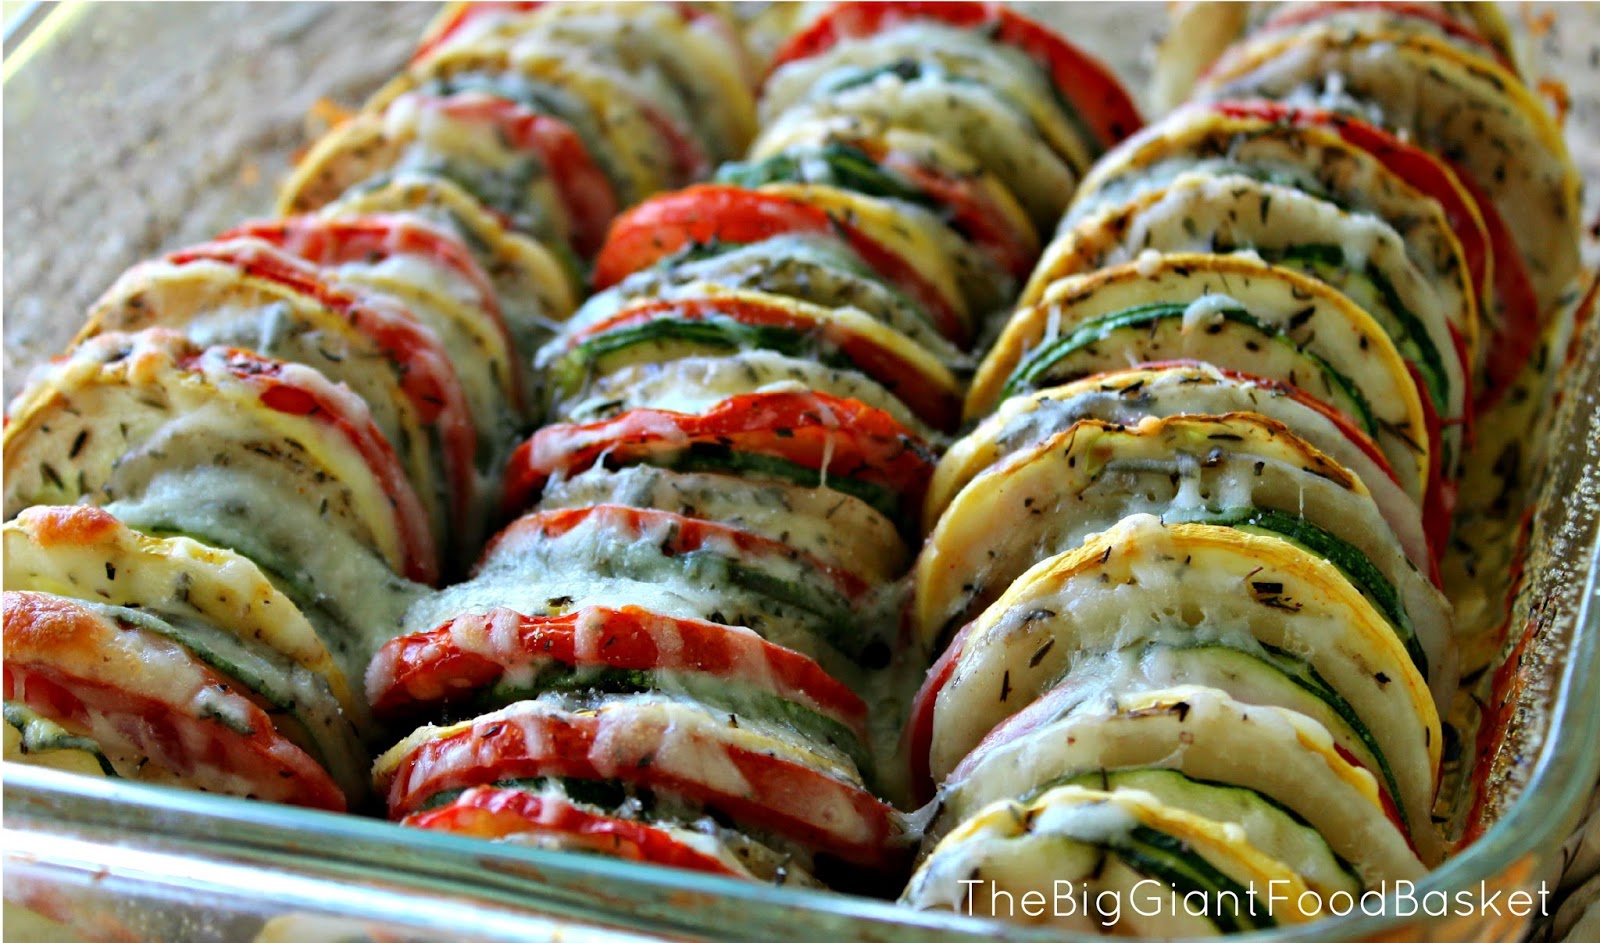
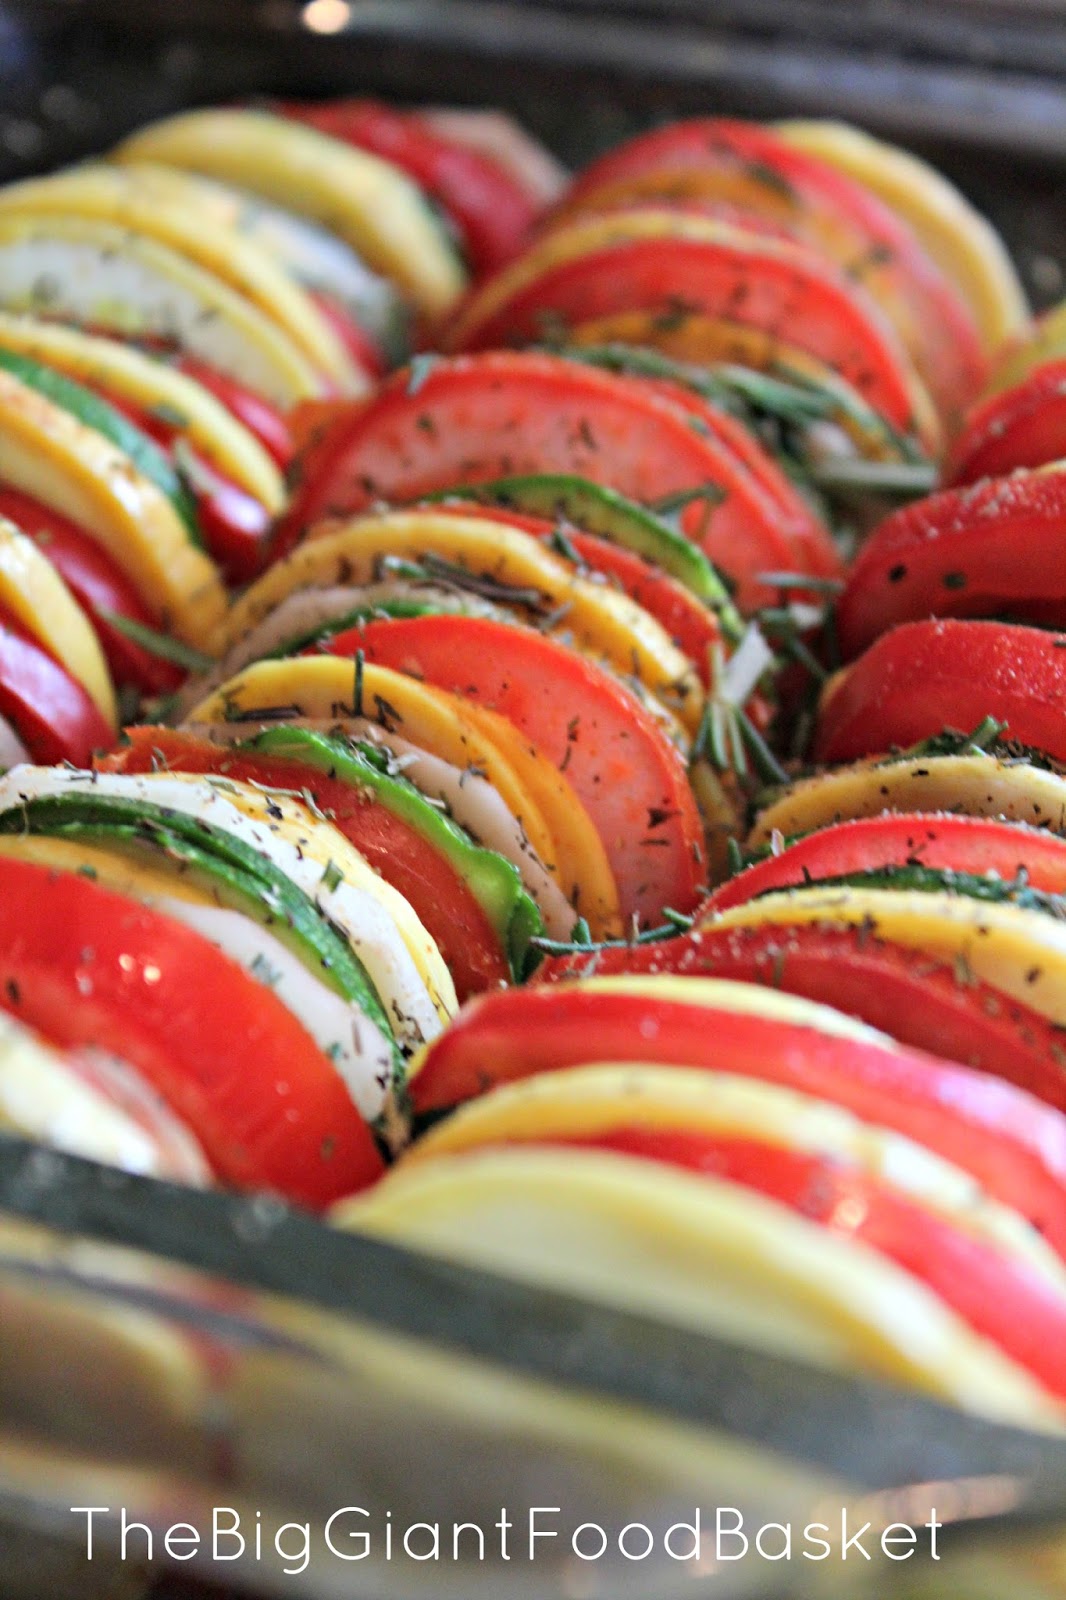
Super Easy Summer Vegetable Casserole


Now that all of those yummy summer vegetables are becoming plentiful, I am always on the look out for new ways to prepare them. The other day I saw this recipe floating around on Facebook and was so impressed with the pretty colors, the fact that the slices veggies are vertical, and aside from the cheese (I used extra cheese), it really is a pretty healthy dish! So yes...I had to make this casserole!


Ingredients:

Extra Virgin Olive Oil for sautéing
1 medium onion, chopped
2 large cloves of garlic, chopped

Now try to keep the slice thickness the same for all of the sliced veggies. I used by brand new food processor for the zucchinis and potatoes.

2 zucchinis, sliced
2 potatoes, sliced
2 summer squashes, sliced
3 plum tomatoes, sliced
salt and pepper
dried thyme
fresh rosemary, chopped
1 cup shredded Italian cheeses


Sauté the garlic and onions in the olive oil until soft, about 5 minutes. Spray an 8 x 8 inch baking dish with cooking spray. Spread the garlic and onion mixture on the bottom of the pan and then begin to stack your veggie slices vertically. I stacked my zucchini, then potato, summer squash and tomato. It kind of rhymes so it's easy to remember. Yay that and the fact there are only 4 vegetables!!!

Season generously with salt, pepper, rosemary and thyme. Cover dish with aluminum foil and bake in an oven set at 400 degrees for 30 minutes. Uncover and sprinkle on the cheese and then return to the oven for another 15 to 20 minutes until the cheese is a golden brown.

Serve hot and enjoy those vegetables!!!

 XO
Sharing this recipe over at these wonderful blog parties...
BeColorful

SUPER EASY SUMMER VEGETABLE CASSEROLE

July 30, 2013

Buttermilk and Oatmeal Bread with a Honey Butter Spread


Last week while we were on vacation visiting the Canadian side of Niagara Falls, Chris and I took the kids out for dinner at this wonderful steak house over at the Fallsview casino mall called the Canyon Creek Chop House. 


The first thing we were served was a delicious bread with this ah-mazing honey butter spread! At that point I knew I would be on a mission to recreate that butter.


As it turns out, the butter was pretty easy to make. It is a 2:1 ratio of butter to honey, just let the butter sit at room temperature until it becomes soft, do not melt it in the microwave. Once soft add the honey a whip the butter and honey together. You can store it in the refrigerator as you would any butter, but make sure you remove it from the frig about 15 minutes before spreading it so it has the chance to soften naturally.

Now for the bread...I actually went on line looking for a nice healthy bread recipe and came across this buttermilk and oatmeal bread at a blog call Courage in the Kitchen. This recipe is very simple and the bread is incredibly soft and moist.


Ingredients:

2 cups of warm water
1/4 tsp white sugar
2 1/4 tsp. active dry yeast
1 cup buttermilk
1/4 old fashion oatmeal (must be old fashion oatmeal, no quick cooking or instant oats)
1/4 brown sugar
1 T salt
2 T butter
4-5 cups of all-purpose or bread flour (I used bread flour because I happen to have it on hand

First put 1/2 cup of water in a small bowl and then stir in the 1/4 tsp. of white sugar along with the dry yeast. Make sure the water is roughly body temperature...if it is too hot it will kill the yeast. Let mixture stand to proof the yeast. (Proofing the yeast = until the yeast becomes active)

Bring the rest of the water 1 1/2 cups to a boil and add the oatmeal, let cook for about 3 minutes or until it begins to thicken. Pour the oatmeal into a large bowl and stir in the butter, salt, brown sugar and buttermilk. Mix until smooth. This should cool the oatmeal enough for you to handle. Begin to add the flour and keep adding it until the flour until the dough begins to pull away from the sides of the bowl.

Turn the dough out onto a generously floured surface and knead the dough for 10 minutes. It will be sticky at first but as you knead it it will become pliable and elastic. Add more flour as to your working surface as necessary. Place dough in a  bowl which has been greased with butter, shortening of cooking spray. Roll the dough until it is coated with the grease. Cover with damp towel and place in a warm spot to allow it to rise to 2 times its original size. This may take anywhere from 45-50 minutes.

Grease two 9 X 4 1/2 in loaf pans. Once the dough doubles in size, punch it down and knead for one more minute. Split the dough in half and place each half into a prepared pan. Again cover the two pans of dough and let them rise until the dough is even with the top of the bread pans. Place the pans in the center rack of an oven preheated to 375 degrees and let bake for about 30-35 minutes. The original recipe says to let it bake for 40-45 minutes, so just keep an eye on it as oven temperatures do vary.

 Remove from oven and let cool slightly. I like my bread on the softer side so I wrapped each loaf with plastic wrap and aluminium foil while they were still warm.


Enjoy!!!

XO
Sharing this post at link parties over at these wonderful blogs...


BUTTERMILK OATMEAL BREAD WITH A HONEY BUTTER SPREAD

July 19, 2013

Adorable Minion Cupcakes


What better way to celebrate the return of the Twinkie and Disney's new movie Despicable Me 2 than with Minion cupcakes!

The other day a good friend posted this on my Facebook page which was a share from a page called Recipes Galore. They were so cute that I had to make them tonight for the kids as they watched the first Despicable Me flick.

Note: If you cannot find Twinkies per say, here in the northeast we have the Tastycake version called Dreamies.


Wishing you all a great weekend!!!
XO

Sharing over at these super blog parties...


ADORABLE MINION CUPCAKES

July 15, 2013

Baked Pork Chops with a Savory Blueberry Sauce


OK I was a bit skeptical myself, but this sauce is so savory despite the 4 tablespoons of brown sugar that it takes on a life of it's own!!! I used a combination of some fresh and dried herbs. The pork chops are given a quick browning in the pan and then finishes cooking in the oven


Ingredients:

4 boneless pork chops
1 tsp. garlic powder
1/2 tsp. fresh cracked pepper
a dash of cayenne pepper
flour for dredging

1 cup fresh blueberries
4 T brown sugar
1 tsp. fresh parsley, minced
1 tsp. fresh sage, minced
1/2 tsp. dried thyme
1 tsp. Balsamic vinegar

Season the chops with the garlic powder, pepper and cayenne pepper and then dredged the chops in the flour. Set aside. Heat olive oil in an oven safe pan, (I used olive oil infused with garlic and rosemary but plain is fine too) and add the chops, cooking about 4 minutes on each side until they turn brown. Place the entire pan in the oven heated to 350 degrees F. Cook for roughly 10 minutes or until the inner temperature of the chops reached 170 degrees F. 


In the meantime mix together the next six ingredients. Once the pan is removed from the oven move the chops to a plate and cover them with tin foil. Add the blueberry mixture to the hot pan and heat on the stove top. Cook until he blueberries begin to break down. Take any juice that has drained from the pork chops on the plate and pour into the blueberry mixture. Cook for about 3 more minutes. Remove from the heat and serve immediately with your chops!!!


 Enjoy!!!
XO


BAKED PORK CHOPS WITH A SAVORY BLUEBERRY SAUCE

Trip Advisor